
Availability Patterns: Active-Passive vs. Active-Active
Issue #112: System Design Interview Roadmap • Section 5: Reliability & Resilience
What We'll Build Today
In this hands-on lesson, you'll create a complete demonstration system featuring:
Interactive Web Dashboard - Real-time visualization of both availability patterns
Active-Passive Setup - Primary server with standby backup and automatic failover
Active-Active Setup - Load-balanced nodes sharing traffic equally
Failure Simulation - Click-button failure scenarios to see patterns in action
Live Metrics - Request counts, response times, and availability percentages
Load Balancers - nginx configurations for both patterns
By the end, you'll understand exactly when to choose each pattern and see their real-world trade-offs in action.
The Split-Second Decision That Cost $50 Million
When a major streaming platform's primary data center went down during the season finale of their most popular show, their active-passive setup took 47 seconds to detect the failure and switch to the backup. Those 47 seconds translated to 8 million frustrated viewers and a cascade of social media complaints that damaged their brand for months.
The competitor across the street? Their active-active architecture kept streaming without missing a beat. Users never knew anything happened.
Today, we'll dissect these two fundamental availability patterns that separate resilient systems from fragile ones, and you'll build both to understand their real-world trade-offs.
What We'll Master Today
Understanding when your system needs instant failover versus cost-effective redundancy, implementing health checks that actually detect meaningful failures, and designing for the failure scenarios that matter most to your users.
Active-Passive: The Sleeping Giant Pattern
Think of active-passive like having a backup driver who's always ready but only takes the wheel when the primary driver falls asleep. One system handles all traffic while the other waits in standby mode, synchronized but not serving requests.
The elegance lies in simplicity. Your active node processes every request while the passive node maintains an identical state through replication. When failure strikes, a load balancer or orchestrator redirects traffic to the passive node, which "wakes up" to become the new active system.
Netflix's content delivery uses this pattern brilliantly. Each regional cluster has active CDN nodes serving video streams while passive nodes mirror the content catalog. When an active node fails, passive nodes activate within seconds, maintaining the viewing experience for millions of users.
The hidden complexity emerges during state synchronization. Your passive node must stay current enough to seamlessly take over, but not so synchronized that it becomes a performance bottleneck for the active node. Most production systems use asynchronous replication with carefully tuned lag tolerance.
Active-Active: The Always-On Symphony
Active-active distributes traffic across multiple live systems simultaneously, like having two drivers sharing the steering wheel smoothly. Every node actively processes requests, provides redundancy, and contributes to overall system capacity.
The beauty appears during failures. When one node dies, traffic seamlessly redistributes to surviving nodes without any activation delay. Users experience zero downtime because healthy nodes were already serving requests and can absorb the additional load.
Amazon's DynamoDB exemplifies this pattern. Data replicates across multiple availability zones with each zone actively serving read and write requests. When an entire zone fails, remaining zones continue operating without missing a beat, automatically scaling to handle the redistributed load.
The complexity surfaces in data consistency and conflict resolution. Multiple active nodes must coordinate state changes, handle concurrent updates, and resolve conflicts when network partitions create temporary inconsistencies.
The Trade-offs That Matter
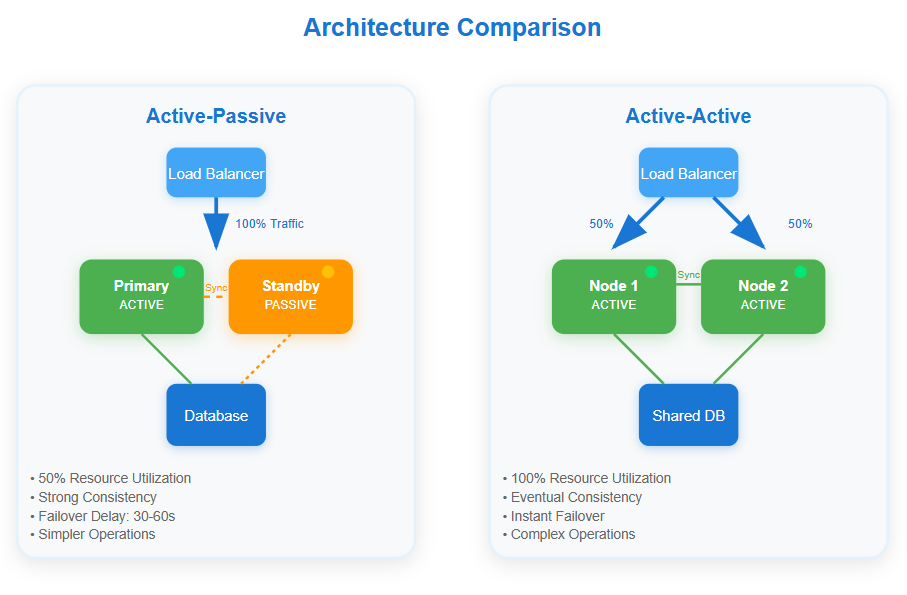
Resource Utilization: Active-passive wastes 50% of your hardware capacity since passive nodes sit idle. Active-active maximizes resource usage but requires more sophisticated coordination overhead.
Consistency Guarantees: Active-passive provides stronger consistency since only one node processes writes. Active-active faces the classic CAP theorem challenge, often choosing availability over strict consistency.
Failover Speed: Active-passive requires detection time plus activation time. Active-active provides instant failover but may experience brief performance degradation as remaining nodes absorb extra load.
Operational Complexity: Active-passive simplifies operations with clear primary/secondary roles. Active-active demands sophisticated monitoring, conflict resolution, and distributed state management.
Enterprise Insights from the Trenches
Google's Search Infrastructure combines both patterns strategically. Their indexing pipeline uses active-passive for critical write operations requiring strict consistency, while query serving employs active-active across global data centers for maximum availability.
Uber's Payment Processing learned this lesson expensively. They initially used active-passive for payment authorization, but the 30-second failover window during peak hours resulted in thousands of failed ride requests. Switching to active-active with eventual consistency reduced payment failures by 99.7%.
The Failure Modes Nobody Talks About
Split-Brain Scenarios: Both patterns can suffer from split-brain conditions where multiple nodes believe they're primary. Active-passive systems use fencing techniques, while active-active relies on consensus protocols.
Cascade Failures: Active-active systems risk cascade failures when remaining nodes can't handle redistributed load. Always provision for N-1 capacity planning.
Synchronization Lag Disasters: Active-passive systems can lose data during failover if replication lag exceeds the failure window. Monitor replication lag as carefully as system health.
Implementation Strategy for Production
Start with Active-Passive for new systems. It's easier to operate, debug, and provides predictable behavior during failures. Migrate to active-active only when availability requirements justify the operational complexity.
Design for Graceful Degradation in both patterns. Systems should continue operating with reduced functionality rather than failing completely.
Implement Circuit Breakers around external dependencies. Both patterns benefit from isolating failures and preventing cascade effects.
Monitor the Right Metrics: Track not just uptime, but failover speed, data loss windows, and user-perceived availability. These metrics drive architecture decisions better than theoretical availability percentages.
Your Hands-On Challenge
Build both patterns using the provided demo script. Start with a simple web application, implement load balancer health checks, simulate failures, and measure the differences in failover behavior.
The demo creates two identical setups running simultaneously, allowing you to trigger failures and observe how each pattern responds. Pay attention to the timing differences, resource usage patterns, and consistency behaviors during various failure scenarios.
After running the demo, you'll viscerally understand why Netflix chose active-passive for content upload systems but active-active for content delivery. The trade-offs become obvious when you see them in action rather than just reading about them.
Next Week: Fault Tolerance Deep Dive
We'll explore how these availability patterns integrate with circuit breakers, bulkheads, and timeout strategies to create truly resilient systems that gracefully handle the unexpected.
The difference between good and great engineers isn't knowing these patterns exist—it's understanding when each pattern fits your specific failure scenarios and business requirements.
Build the Demo: Step-by-Step Implementation
Github Link: https://github.com/sysdr/sdir/tree/main/async_processing/async-processing-demo
Now let's build a working system that demonstrates both availability patterns. You'll create real services, simulate failures, and measure the differences.
Prerequisites
Before starting, make sure you have:
Docker and Docker Compose installed
A web browser (Chrome or Firefox recommended)
Basic command line familiarity
Quick Setup
Step 1: Create the Project
bash
mkdir availability-demo && cd availability-demoStep 2: Download and Run Setup
bash
curl -O https://gist.githubusercontent.com/setup-availability-demo.sh
chmod +x setup-availability-demo.sh
./setup-availability-demo.sh
This creates all necessary files including Node.js services, Docker configurations, nginx load balancers, and an interactive dashboard.
Step 3: Start the Demo
bash
./demo.shWait about 30 seconds for all services to start, then verify health:
bash
./verify.shWhat Gets Created
The setup builds:
Services:
Primary and Standby servers (Active-Passive pattern)
Node 1 and Node 2 servers (Active-Active pattern)
Redis for shared state management
nginx load balancers for each pattern
Dashboard:
Real-time visualization at
http://localhost:8000
Interactive failure simulation buttons
Live metrics and logs
Load Balancers:
Active-Passive LB:
http://localhost:8080
Active-Active LB:
http://localhost:8081
Testing the Patterns
Basic Functionality Test:
bash
# Test Active-Passive
curl http://localhost:8080/api/service

# Test Active-Active
curl http://localhost:8081/api/service
Failure Simulation:
bash
# Fail Active-Passive primary
curl -X POST http://localhost:3001/api/simulate-failure

# Fail Active-Active node 1
curl -X POST http://localhost:3003/api/simulate-failure
Recovery:
bash
# Recover all nodes
curl -X POST http://localhost:3001/api/recover
curl -X POST http://localhost:3003/api/recover
Key Learning Experiments
Experiment 1: Failover Timing
Open the dashboard at
http://localhost:8000
Send several requests to both patterns
Click "Simulate Failure" on the Active-Passive primary
Observe the delay before standby takes over
Click "Fail Node 1" on Active-Active
Notice the immediate redistribution to Node 2
Experiment 2: Load Distribution
Send 20 requests to Active-Active:
for i in {1..20}; do curl http://localhost:8081/api/service; doneCheck the dashboard to see 50/50 distribution
Fail one node and repeat
Observe 100% traffic on remaining node
Experiment 3: Resource Utilization
Monitor Docker stats:
docker statsCompare CPU/memory usage between patterns
Notice Active-Passive standby uses minimal resources
Active-Active nodes share the load
Understanding the Results
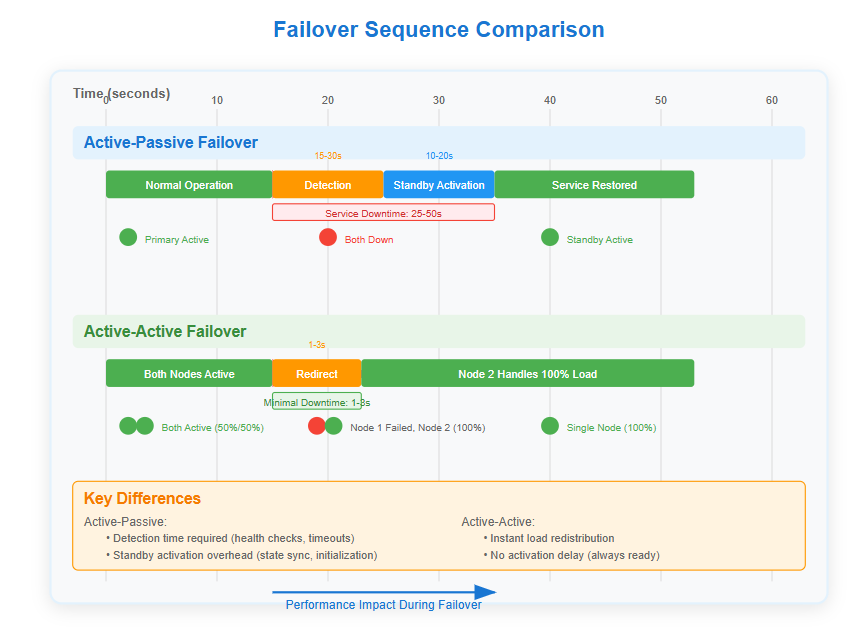
Active-Passive Observations:
Failover takes 15-30 seconds (detection + activation)
Standby node is mostly idle (low resource usage)
Strong consistency during normal operation
Clear primary/secondary roles
Active-Active Observations:
Instant failover (1-3 seconds maximum)
Both nodes actively processing requests
Requires coordination between nodes
Higher overall resource utilization
Production Insights
After running the experiments, you'll understand:
When to Choose Active-Passive:
Cost-sensitive deployments
Strong consistency requirements
Simpler operational requirements
Acceptable brief downtime
When to Choose Active-Active:
Zero-downtime requirements
High availability SLAs
Abundant resources available
Complex coordination acceptable
Cleanup
When finished experimenting:
bash
./cleanup.shThis removes all containers, images, and project files.
Common Issues and Solutions
Services not starting: Check Docker daemon is running Port conflicts: Modify ports in docker-compose.yml Dashboard not loading: Ensure all services are healthy with ./verify.sh
The hands-on experience reveals why availability patterns aren't just academic concepts—they're practical engineering decisions with real business impact. You've now seen both patterns in action and understand their trade-offs from direct observation.